Bad USB is a term used when referring to a modified USB device that when connected to a computer, will act as a HID (Human Interface Device), like a keyboard. With the new “keyboard” installed in the system, it will simulate keystrokes in order to run pre-programmed malicius commands.
This type of attack became very popular with the release of Rubber Ducky, a Hak5 product that does exactly what i mentioned above. Despite being an excellent product, isn’t the cheapest “toy” a hacker can afford, costing $44.99 dollars. If you don’t leave in the USA like me, add some more $$$ due to taxes and maybe months for the product arrive.
I started this project because i wanted to learn more about these types of attacks, and since i couldn’t affoard a Rubber Ducky, nor wanted to buy an imported product and wait 1-2 months for it to arrive, i started to search for some similar products, and so i found some work being done with Digispark and Micro Pro (next post).
With Digispark costing around $1 and Micro Pro around $3, and mostly important, i could find both of these in my country, no need for imports.
But that’s enough of talking, let’s go to the fun part… but first:
Warning 1: This content is for educational purposes only. Don’t do wrong things with it. =)
Warning 2: I hold no responsability if any problems that may happen while you are following this post. From a brick Digispark to whatever you did wrong. =P
:: Hardware Used
All that i used for this project was:
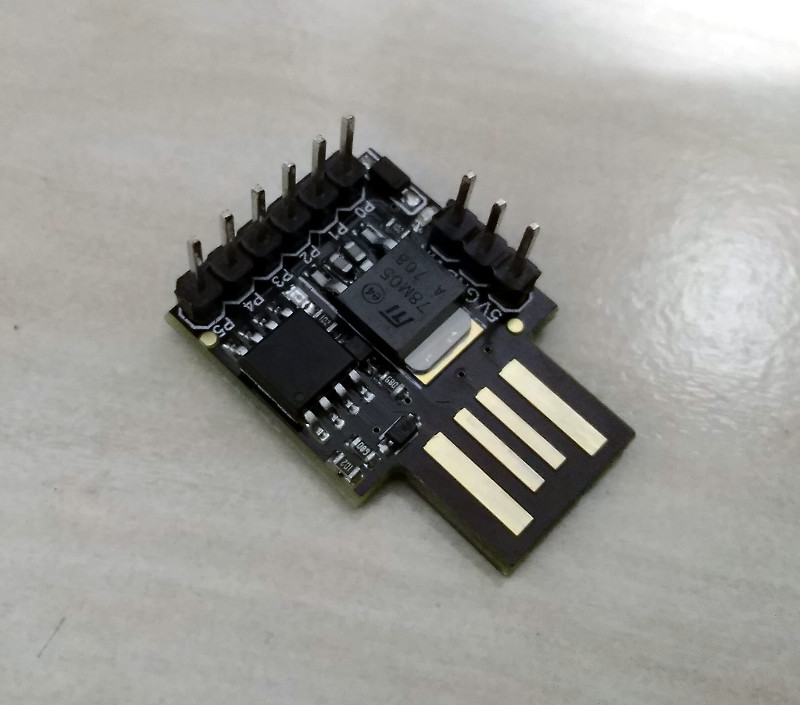
- 1x Digispark
- 1x Jumper wire F/F (Only needed for the fastboot mod)

:: Drivers and software instalation
::. Step 1: Installing & Configuring Arduino IDE
First we gonna install Arduino IDE to write our code and then upload it to out Digispark.
Go to the Arduino official site and download the right setup file for your OS. While installing, there’s no need to change the default options, besides the directory you want to install it.
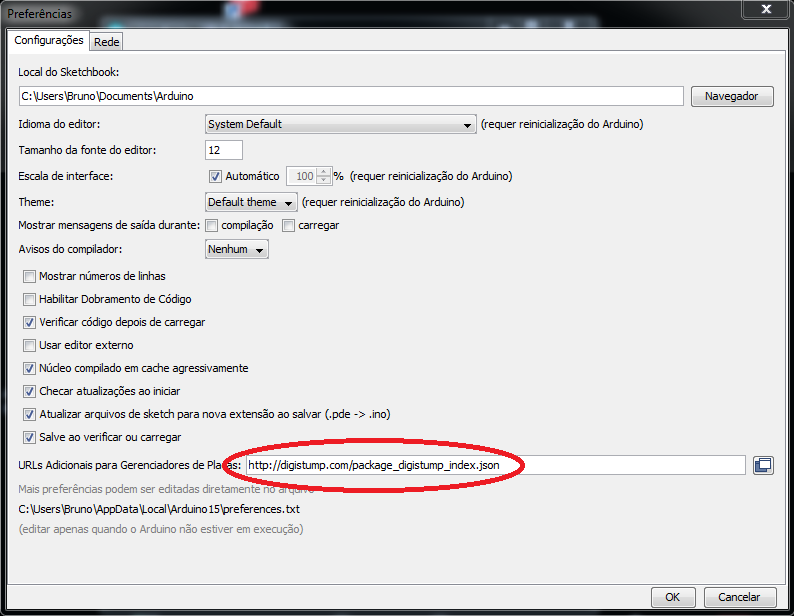
After installed, open Arduino IDE and go to:
File -> Preferences -> Additional Board Manager URLs
And add the following url in the Additional Board Manager field:
http://digistump.com/package_digistump_index.json
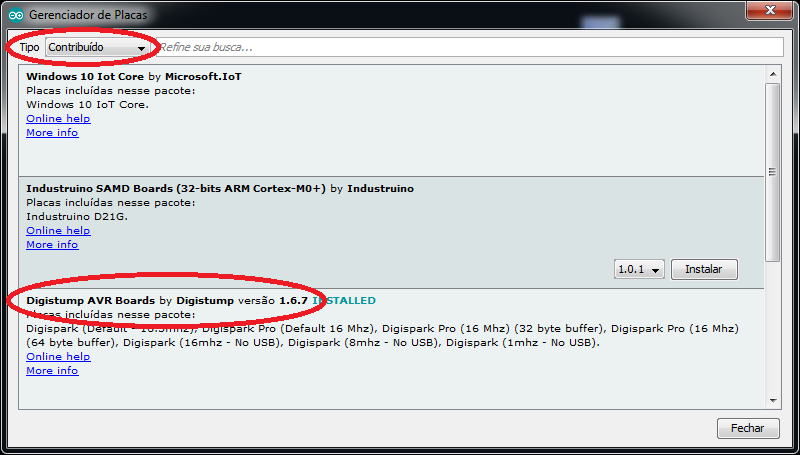
Now, go to:
Tools -> Board -> Boards Manager
In the Boards Manager window, select the “Contributed” type from the drop down menu, select Digistump AVR Boards package and install it.
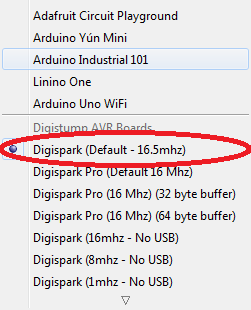
With all previous configuration done, we now have the option to select a Digispark board in the Tools -> Board. We will use the Digispark (Default - 16.5mhz) one.
With the IDE set up, let’s install the Digispark drivers so the IDE can detect and communicate with the board.
::. Step 2: Installing Digispark Bootloader Drivers (Windows)
Download the latest (that i’m aware of) drivers here. If you have a 32bit system, use the DPinst.exe installation file, and DPinst64.exe for a 64bit system.
::. Step 2: Installing Digispark Bootloader Drivers (Linux)
I haven’t tried on linux yet. Will be doing this really soon.
:: Coding
There’s varius libraries available to Digispark. We will be using the Digikeyboard.h library in order to simulate a new keyboard plugged in the machine.
I will not explain about the Arduino, it’s IDE or commmands, there are many great tutorials on the internet, much better ones then i could write. :)
You could start reading a little bit about the environment and language here and here.
::. Hello World
For our first code, we will only use the delay(), print() and sendKeyStroke() functions. The code below will open the Execute window throut it’s shorcut, type notepad, press enter and write our text on it.
While writing your code, keep an eye in the delay times. If you are opening a program, and then writing something in it, the delay can’t be too short so that our writing starts before window has opened. Even if the timing is working perfectly on your computer, it may not work on the target computer. If it’s a slower computer, the delays needs have a higher value, but not so much that takes over 1 minute to run the entiry script.
Delays are very important and require a fine tunning, a missing character can, and will, break the “flow” of your script logic while executing.
#include "DigiKeyboard.h"

void setup() {
  DigiKeyboard.sendKeyStroke(0);   // Prevent missing the first character/key stroke
  delay(1000);                     // This delay can't be lower than 1 second


  /**  Open Execute window  **/
  DigiKeyboard.sendKeyStroke(KEY_R, MOD_GUI_LEFT);   // Send Windows Key + R
  delay(500);                                        // Delay in miliseconds

  /**  Write the Program Name  **/
  DigiKeyboard.print("notepad");                     // Will "type" notepad on whatever window is active
  delay(250);
  DigiKeyboard.sendKeyStroke(KEY_ENTER);
  delay(1000);

  /**  Write Text  **/
  DigiKeyboard.println("Hello World");
  delay(250);
  DigiKeyboard.sendKeyStroke(KEY_ENTER);

  DigiKeyboard.print("It's working!!!  =)");
}
Now it’s finally time to get your Digispark and upload the script you just created. If you have him already plugged in your computer, first remove it, or it wont work.
By default, every time a Digispark is powered (just connected to a USB), it’ll wait 5(ish) seconds looking for communication attempts, like a new script upload request, and only after that it will run the script that he has in his memory.
So… With the Digispark disconnected, click in the “Upload” button (or CTRL+U), and wait for the following message appear:
img(connect digi)
Now you can connect you Digispark so out hello world script get’s uploaded. After a few seconds, if everything goes right, the following message should show up:
img(uploaded)
Time to test if our script runs fine.
(gif DS running hello world)
Rubber Ducky Scripts to Digispark
Making it (boot) Fast!
References
- https://www.arduino.cc
- https://digistump.com
- https://digistump.com/wiki/digispark/tricks
- https://digistump.com/wiki/digispark/tutorials/connecting
- https://digistump.com/board/index.php/topic,320.0.html
- https://digistump.com/board/index.php?topic=175.0
- https://github.com/micronucleus/micronucleus
- https://github.com/micronucleus/micronucleus/tree/v1.11/upgrade/releases